Frequently Asked Questions About MHI Winter Meeting
JW Marriott Atlanta Buckhead
3300 Lenox Road NE, Atlanta, GA
Registration is located in the foyer on level 2.
Network: MHI Winter Meeting
Password: GAFEnergy
Complimentary Wi-Fi is brought to you by GAF Energy
Your registration includes all educational and networking events taking place. Preview the schedule for a list of all available events.
Yes, membership is required to attend the Winter Meeting.
Become a member now at ManufacturedHousing.org.
Yes, registration is available onsite. For a list of onsite pricing, visit the Registration page.
All participants at the MHI Winter Meeting must be registered attendees.
Contact Naida Struyk at nrooney@mfghome.org for sponsorship and exhibit opportunities for 2026.
Contact Gay Westbrook at gwestbrook@mfghome.org.
Frequently Asked Questions About the MHI Events App
On Your Browser
The Event Space can be accessed using the Event URL in a browser on any desktop or smartphone device. The URL is eventmobi.com/mhiwm26/.
If you are using a mobile browser on a smartphone device, a prompt to add the event to your device's home screen will appear, which will help in caching the event information, and making it easily available to you the next time you would like to access it. The process for doing this depends on your device and browser, but it usually involves clicking the browser's menu button and choosing the option that sounds most like "Add/Save to home screen."
Stop by the registration desk to confirm the registered email with a member of our team.
Networking with other attendees is simple. Once the app is open on your mobile device or browser, select "Attendees".
You will then see a list of all the registered attendees. Select an attendee that you'd like to start a conversation with and simply press "Send a Message".
- You can create a personal schedule by navigating to the Agenda section and clicking the Add to Schedule option on any sessions that you would like to attend.
- Navigate to your schedule by clicking the profile icon in the top-right corner of the Event Space, followed by the Your Agenda option in your Attendee dashboard.
- Click Export Calendar at the top of that page to download the .ics file.
- Click Add on the prompt to add it to your calendar.
The following section types allow for you to search content within them.
- Documents
- People (Speakers and Attendees)
- Companies
Once you search for the content you are looking for within that section, a list of all items containing that text will display. If you are searching for an attendee named John, but you are unsure of his last name, then the search will act in generating a list of all profiles that include the name "John".
Within your People lists specifically, you will find an additional option to the left of the search bar that will allow you to define what content you are looking to search by. From this list you can select from the following items:
- First & Last Name
- Title
- Company
- Custom Fields
Adding an image to your profile can be done in one of two ways:
From the App / Event Space
- Login to the Event Space with the email address you used to register for the event.
- Click the Profile Icon in the top-right corner to open the Attendee Dashboard.
- Click the Edit Profile button to see your profile page.
- Enter your profile information then, click Save at the bottom of your profile page.
From a Self-Edit Link
MHI sent you a Self-Edit Link via email and you can use it to access your profile.
1. Open the organizer’s email and click the link provided.
2. Select the Personal Information option to update your profile details.
3. When you’re finished, click Save Profile at the bottom.
4. Access the Documents option (if applicable) to attach resources directly to your profile.
5. Choose the External Links option if you would like to include additional URLs in your profile.
Open the MHI Events App on your mobile device or browser. Select "Attendees" on the main homepage.
A list of all the registered attendees will populate. Select an attendee and press "Schedule a Meeting" to start networking. You'll be able to "Write a Note" to set a topic of discussion or any additional information.
Once they accept or decline the invitation, you'll receive confirmation as a push notification in the app and an email.
Attendee messaging provides an easy way to network and communicate with others who are also at the event, and is included in all app packages that offer Attendee profiles.
How Do Attendees Message Each Other?
Users will need to log into the Attendee Dashboard (right hand menu) of the app to chat with others using the Messaging option found in the Favorites area. Here they will find an option to Start a New Conversation, and to reference any ongoing conversations.
From the Start a New Conversation button, users will be directed to a list of Attendees that they can send a message to. Conversations can also be started directly from the Attendee section of the app by selecting a profile and using the Send them a Message button.
How Do Attendees Receive Messages?
Attendees who have received a message will be notified within the app. The Event Feed at the top of the app will indicate when a message has been received and will populate a menu where the user can see these details at a glance and/or access the Message directly. Attendees who have accessed your event information from a custom branded app, or the EventMobi Universal app will also receive a push notification each time they are sent a message.
Users will also receive an email notification if they are receiving a message from an attendee for the first time, and they are not in the app at the time that it is sent. If users happen to have the app open when it is sent, they will not receive an email notification.
Please use the email address you used when registered for the 2026 MHI Winter Meeting.
If you are receiving an Incorrect Password error, or do not remember your password to log into the app, you can reset your password in the following steps:
- On the login screen or menu, click "Forgot Password?"
- Enter your email and click Send.
- In the password email that you receive in your inbox, click "Create New Password"
- Enter your new password and confirm it.
- Once you have confirmed your new password, you can go back to the login screen in the app and enter your new information to log in.
OR
- On the login screen or menu, click “Login using a one-time code instead”
- An email will be sent to you with a verification code
- Enter the verification code in the login screen of the event space
- You will now be able to access the event space
Note: When creating a new password, you need to meet the following requirements: The new password must be at least 8 characters long, contain at least 1 letter, 1 number and 1 special character in it.
If an announcement has been sent out, you will see it in the MHI Events App as a pop-up. You can also find it in your Announcements section, which archives all the announcements that have been sent out.
Note: Keep in mind that you will need an internet connectivity to receive announcements.
Push Notifications
If you are using an iOS or Android device and downloaded the MHI Events App, you can receive announcements with push notifications. These notifications will appear alongside the other push notifications from your other apps and will also appear as red counter annotation next to the event app icon on your device's home screen.
To see all your notifications, messages and announcements in one spot...press the bell icon in the top right corner.
A drop-down menu will open, and you'll be able to view any notifications, messages and announcements.
The MHI Events App can be accessed on any current web browser as well as the Apple App Store and Google Play.
Private Browsing? Disabled Cookies?
It is likely that Private Browsing is turned on OR cookies have been disabled in your browser settings. These are needed for the app to work. If you see a message that reads "Not loading? Try switching to a simplified web app by clicking here” or “Make sure to enable cookies on your device!” then the app is not able to save cookies.
Please find some general instructions for adjusting the browser settings of most iPhones, Androids, and Blackberries below.
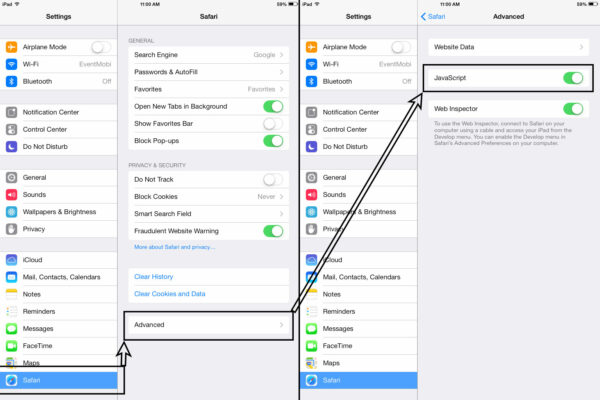
iPhone
1. Navigate to Settings > Safari
2. Scroll to the Bottom and select "Advanced"
3. Make sure 'Block All Cookies' is toggled off
4. Open Safari Browse > In the bottom-right corner, click Private to disable private browsing. You can leave all your windows open and then just return to and refresh your app.

5. Make sure JavaScript is enabled. Navigate to Settings > Safari > Advanced and then toggle JavaScript to green or ON.
Android
1. In your phone’s browser menu, go to Settings > Privacy Settings (or Privacy and Security on some Androids)
2. Make sure that Accept Cookies is checked.
Note: Terms for menu options are approximate as menus in different Android models vary slightly.